Using the AI Invoice Feature
The AI invoice feature in Deacom matches up invoices submitted to existing Deacom PO’s. If an invoice matches a PO that has not yet been received, the system will hold the invoice in a pending state and automatically process it once the PO receipt is posted.
Configuration
Prior to using the AI Invoice feature, the following configuration steps or master data setups are required. In most cases, companies will have already completed some of these setup steps during the implementation process.
Master Data
- Chart of accounts should be in the system at this point.
- Vendors must be entered into the system and validated.
- Vendor Part Numbers (Recommended) : The system now includes Vendor Part Number and Vendor Part Description in the serialized JSON payload sent to the Nexus AI endpoint. Populating these fields in Deacom significantly improves the AI's ability to independently match line items when vendors use their own part codes.
- Note: While these fields improve line matching, the system will only automatically invoice the order if the PO Number, Vendor, Total, Terms, and Due Date return a confidence score of 75% or higher with no price or quantity variance.
Deacom data shared with the AI
|
Data Category |
Key Fields Sent to Nexus AI |
|---|---|
|
Vendor Identity |
Tax ID/VAT Number, Vendor ID, Contact Email/Phone |
|
Addresses |
Physical Address, Remit-To Address, Vendor Group Address |
|
PO Header |
Confirmation Date, PO Text 1 & 2, PO Search 1 & 2, PO Dates 1-5 |
|
Custom Fields |
All Header UDFs (including the Field Name/Caption) |
|
Logistics |
Facility Address, Ship-To Address, Freight Type, Ship Via |
Security
Security specific to the new Accounting > Invoice Entry and Accounting > Invoice Reporting menu options are listed below:
- Accounting – invoice entry – Access to menu
- Accounting – invoice reporting – Access to menu
- Accounting – edit accounting invoices
- Accounting – post accounting invoices
- Purchasing –- Post AP invoices with adjustments – This is required to post an invoice if any adjustment lines (like freight or price variances) exist.
API Server
The Deacom API server must be running and accessible internally to facilitate AI operations. Note: With the update to the Nexus AI bulk upload service, a publicly accessible Deacom API connection is no longer required for the matching process. The system now streamlines interactions by automatically serializing all received but non-invoiced Purchase Orders into a JSON format and sending them directly to the AI endpoint.
API Profile
Once purchased, credentials for AI invoicing will be supplied by license delivery. The credentials will be used to setup and API profile (via System < Maintenance > API Profiles) to connect the system to the AI API’s. Test/Sandbox mode should not be used.
Note: Customers will need to have the Deacom API setup and running.
Example API Profile:
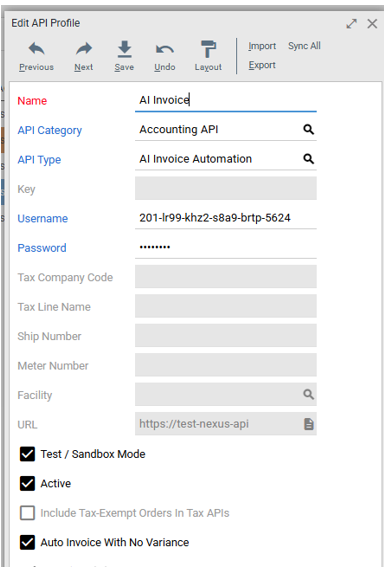
Note: The Auto Invoice With No Variance field must be enabled on the API Profile to allow the system to automatically invoice exact matches. When enabled, the system evaluates the invoice against specific confidence and variance criteria before attempting to post. (See Criteria for Automatic Invoicing below for details).
Endpoint Update: The system now utilizes the Nexus AI bulk upload service. This service independently matches uploaded invoices with the appropriate Purchase Orders using the serialized PO data sent from Deacom. This architectural change simplifies setup and improves the reliability of the matching logic.
Accounting > Options > AP tab
- AI Invoice Doc Cat – Used to select the appropriate Document Category. When invoices are matched to PO’s through the AI invoice process they will be attached automatically to the Enter Invoice Received form (invrecv3) in Deacom. This document category will be used when attaching the invoice to the PO.
- A/P Adjustments - A default adjustment account must be specified.
AI Invoice Source File
This does not require any configuration by the user. The system will automatically generate a file in the Deacom production folder which contains status information of processing, success, failed, and awaiting receipt.
- Processing – Invoices submitted to the AI process but not yet done.
- Success – Invoices where a PO was found in Deacom and the invoice was attached.
- Failed – A po could not be found in Deacom. These will need to be reviewed by a person.
- AwaitingReceipt - Invoices that matched a Purchase Order that has not yet been received. The system will hold these files here and automatically resubmit them once the PO receipt is posted. Resubmission occurs specifically when the PO is received via the Receive Purchase Orders (Freight3) form via Purchasing > Receive.
Cloud customers may need FTP access if they wish to open the file directly.
On-Premise customers: The Deacom Web Service must have read/write permissions to the addins directory to create and move files between the Processing, Success, Failure, and AwaitingReceipt folders.
Invoice Form changes
The Invoice form, available via Purchasing > Invoice, has been redesigned to support the AI invoice process. The following fields are now available on the header section of the Invoice form.
- Receipt Balance
- Terms Date To Pay
- AI Invoice Summary - The AI Invoice Summary provides more detailed feedback regarding line-item matches by utilizing vendor-specific part information.
Lines will now be visible on the invoice form itself, and the adjustments button has been removed from the form.
- Freight Charges:
- Automated Freight Detection: When an invoice is processed via AI, any shipping charges identified on the document are automatically added to the grid as Freight items. This ensures that automated charges are correctly categorized for financial posting.
- Manual Freight Adjustments: Freight adjustments can also be added or corrected manually. After typing an amount in the freight charges field and tabbing out, the selected freight account will be used to add or update the line immediately.
- There is now a Post and Save button. Users can enter invoice data and save it to review later or have another user review and post. Adjustments are saved to the Purchase Order immediately but do not post to the General Ledger until the invoice itself is posted.
- Purchasing –- Post AP invoices with adjustments: This security is required to post an invoice if any adjustment lines (such as freight or price variances) exist. This allows users to enter invoice data but prevents posting if the invoice does not match the system expectations.
- When editing lines the invoice quantity and invoice price fields will be used to record variances. Lines can still be added for non-stock parts as before in the adjustments form.
- Line-Item Variances: If the AI detects a price or quantity difference on a matched line, the system automatically adds an adjustment line linked to the original PO line that caused the adjustment.
- Header/Total Variances: If the total invoice amount differs due to extra lines (e.g., freight or QC charges not on the original PO), the system adds a generic adjustment line to the default adjustment account.
- The Unprocessed Invoices button can be used to show all files that failed to match Purchase Orders or failed processing. This form also contains the Delete and Delete All buttons to support manual cleanup of the "Failure" folder used with the AI Invoice Feature.
- If either the Vendor Invoiced or Date To Pay fields have an orange outline, the AI did not find that date on the source document and the displayed value is a system-generated fallback. Users should review/edit the highlighted field (change the date value).
Purchase Order Entry form changes
- A new field "AI Invoice Summary" has been added to the General tab of the Purchase Order header. This field displays invoice data when the AI invoice process returns a PO to invoice match. When there is a match the invoice document will also be attached to the PO.
- Only enabled (and visible) if AI Invoicing is enabled in the system by creating an AI Invoice API Profile in the system.
Invoice entry recommendations for matching
- For the most success in matching, it is advised to have the full Deacom PO number on the invoice document.
- For auto-invoicing exact matches the vendor invoice should include both the invoice date, and the date the invoice is due.
- For auto invoice with no variance to be successful:
- Vendor name in Deacom will need to be similar to the vendor name found on the invoices. A 30% similarity threshold (approximately) is required for a match, allowing for common variations and abbreviations such as "Deacom Inc." vs "Deacom Incorporated"
- Invoice Date
- The system uses the invoice date and the terms on the PO in Deacom to calculate the date we expect the invoice to be due.
- Invoice Due Date
- The calculated due date needs to match the Invoice due date for auto invoice to work.
- There can be no line quantity or price variances.
- There can be no extra lines on the invoice.
- Enhanced Matching Fallbacks:To maximize matching success—especially when a vendor fails to include a PO number on their invoice—ensure the following data is accurately maintained in Deacom:
- Tax ID / VAT Number: Ensure this is populated in the Vendor Address or Vendor Group setup.
- Remit-To Addresses: The AI compares the "Remit-To" address on the invoice against Deacom records. Accurate address data (Street, City, Zip) provides a high-confidence fallback for vendor identification.
- PO Confirmation Numbers: If you record vendor confirmation or shipment numbers on the PO Header (e.g., in the PO Text or PO Search fields), the AI uses these to link invoices to the correct PO.
- User-Defined Fields (UDFs): The AI now reads the labels (captions) of your Header UDFs. If you have a custom field for "Project Code" or "Vendor Ref," the AI can use the data in those fields to find a match.
Invoice data populated by AI
When a user opens an invoice on the Invoice form that the AI populated, the following are set:
- The submitted invoice is attached under View Docs.
- The Invoice Amount/Net To Pay will match what the invoice states.
- Variances will be recorded as adjustment lines in the grid to accurately reflect invoice details.
- The Vendor Invoiced Date field and the Date To Pay field will display the corresponding dates from the invoice. Note: If either field has an orange outline, the AI did not find that date on the source document and the displayed value is a system-generated fallback. Users should edit the highlighted field (change the date value). The orange outline will be removed immediately. The updated value and cleared highlight are only saved when you explicitly Save or Post the invoice.
- The Terms Date To Pay is the calculated date based on the invoice date and the terms on the PO in the system.
- The AI Invoice Summary field will display a summary of the information detected by the AI.
- Example of data that will be displayed in this field: Line mi_1 (Raw1 apart): Unit price discrepancy. Invoice price is 12.00, candidate price is 11.50. Total mismatch (1200.00 vs 1035.00)
- On the Invoice lines,
- The Invoice Quantity and Invoice Price will populate from the invoice.
- Variance columns will indicate any differences between invoice data and system expectations.
Tip: The AI Invoice process automatically attaches the original vendor invoice to the purchase order when it matches an invoice to a PO. Users can click the View Docs button to open and review this attached invoice while reviewing the AI-populated invoice data.
Process
Submit
- Navigate to Purchasing > Invoice.
- Click the AI Invoice link button at the top of the form.
- Select the file chooser for 1 file, or the folder to select an entire folder for batch processing (Max 50 files). Users can also drag and drop files and folders for batch processing.
- The system will prompt you once the invoices have been submitted.
The AI process runs in the background. Users can continue with other tasks while the system evaluates the submissions.
When an invoice is automatically resubmitted from the awaiting receipt folder, the system optimizes the process by only sending the specific matched Purchase Order as a candidate, ensuring faster processing and higher matching accuracy.
Duplicate Prevention: Once an invoice has been processed via AI and assigned to a Purchase Order, the system will block subsequent AI Invoice uploads for that same PO to prevent accidental re-submission or data overwrites.
Criteria for Automatic Invoicing
If the Auto Invoice With No Variance profile option is active, the system utilizes the Nexus AI bulk upload service to independently match invoices. The system gathers all "Received but not Invoiced" PO data, serializes it into a JSON payload, and transmits it to the AI endpoint. An order will be automatically invoiced and the source document attached only if the following criteria are met:
- Confidence Threshold: The AI returns a confidence score of 75% or higher for the following primary fields:
- PO Number
- Vendor Name
- Invoice Total
- Terms
- Due Date
- Zero Variance: There is no discrepancy between the invoice and the Deacom PO regarding Line Quantity or Line Price.
- No Extra Lines: The invoice does not contain additional lines (e.g., unexpected surcharges) that are not present on the PO.
- PO Status: The system includes unreceived Purchase Orders in the AI matching process. If an invoice matches a PO that has not yet been received, the system will hold the invoice in the AwaitingReceipt folder and automatically resubmit it for processing once the PO is received.
- Due Date Validation: The calculated due date (Invoice Date + PO Terms) must match the Due Date extracted from the invoice.
- Fallback Matching: If a PO Number is not found or is incorrect, the system will attempt a "Fallback Match." This process confirms the vendor via Tax ID or Address similarity, then evaluates line-item similarity and unique identifiers (like confirmation numbers) to identify the correct PO candidate.
Review
To review and post invoices that have been populated by the AI process.
- Navigate to Purchasing > Invoice.
- Set the Invoice Status field to ‘Not Posted’ to find orders where invoice data has been entered or AI-populated, but the transaction has not yet been finalized.
- Optional, but recommended. Set the Inv Entered By field to "All"
- Click the Show Orders button
All of the orders returned here have had invoice data populated against them but have not yet been posted.
- Continue to view each one to validate the data has been entered correctly and then post. Make any needed changes.
- There is an AI summary field that outlines discrepancies the AI found when populating the data.
- The invoice document will be attached to the PO, and can be opened from the invoice form.
- Five new fields have been added to the grid for this form
Review Notes
- Users can also use the "Sync" report for the AI Invoice API profile in System > History/Performance to see failures for invoice files.
- Troubleshooting Discrepancies:
- If an invoice fails to auto-process, compare the Date To Pay and Terms Date To Pay fields. A difference between these two dates is the most common reason for automatic invoicing being disabled.
- Other common reasons for auto-invoice failure include confidence scores below 75%, line item variances, or the PO not being marked as 'Received'."
Reporting
Submit Reporting
- In System > History/Performance there is a report type named ‘Sync’. Use this and select the API profile used for AI invoicing to report on success and failures when matching up documents.
- Review the failed folder in the AI invoice source folder for any we were unable to find matches for. Without a match we have nowhere to put this so it can’t be found in system.
- The Sync report has been enhanced to capture and display more specific error messages returned by the Deacom API. Previously, these errors were often overwritten by a generic "connectivity issue" message. Troubleshooting Tips:
- If you still see the generic "connectivity issue" message, it likely indicates a true network or server failure where the API was unreachable and could not provide a specific error response.
- Connectivity Errors:If the system is unable to communicate with the AI service during the upload process, a specific error message will be displayed:
- "There was an error when attempting to automatically post the Invoice for Purchase Order [PO Number] using AI Invoice Automation: There was an unexpected connectivity issue when contacting the Deacom API to perform AI Invoice operations. Please make sure the Deacom API Server is running and accessible."
If you see this message, verify that your internal Deacom API Server is active and that the environment has outbound internet access to reach the Nexus AI endpoints.
Variance Reporting
In Purchasing order reporting there is an Invoice Variance report.
- This will show all PO lines with the PO price, and received quantities compared to the invoice price and quantities.
- Adjustment lines linked to PO lines due to price/quantity differences will not be shown as the invoice data is shown on the on line in the report.
- Any adjustments for freight or manually added will also display.
- When using the AI Invoice feature, adjustment PO lines linked to an original PO line are displayed as separate rows . The adjustment lines are consolidated into the original PO line's row to show variances horizontally.
- The Quant Var column shows the difference between the original PO quantity and the invoiced quantity.
Variance Reporting Notes:
- If an adjustment was made during the AI Invoice process, you will see the impact in the Dollar Var and Quant Var columns on the same line as the original part. You no longer need to hunt for a separate "Adjustment" line item.
- Unlinked Adjustments: Note that adjustment lines not linked to a specific PO line will still appear as separate records to ensure all financial data is accounted for.
- If the AI detects a variance and the "Auto Invoice With No Variance" setting is enabled, the system will not finalize the invoice. Instead, the discrepancy details are recorded in the invrecv3 table. Users must manually review these records in the Purchasing > Order Reporting > Invoice Variance report to resolve price or quantity differences before posting.
Variance Reporting Field and Variables
The table below details fields available to the Purchasing > Order Reporting > Invoice Variance report and the Orders To Be Invoiced form.
|
Caption |
Technical Name |
Location |
Descripton / Logic |
|---|---|---|---|
|
Invoice Quant |
pu_invoicequant |
Report & Grid |
The actual quantity recorded on the invoice. |
|
Invoice Price |
pu_invoiceprice |
Report & Grid |
The actual price recorded on the invoice. |
|
Quant Var |
N/A |
Report |
Calculation: Received Quantity - Invoice Quantity. |
|
Dollar Var |
N/A |
Report |
Calculation: PO Extension - Invoice Extension. |
|
Invoice Variance |
invvar |
Grid |
Calculation: Receipt Balance - Invoice Amount. |
|
Date to Pay |
tp_topay |
Grid |
Pulled from the Enter Invoice Received form (invrecv3). |
|
Received Date |
N/A |
Report |
Renamed: Formerly "Received". |
|
Received |
N/A |
Report |
Renamed: Formerly "Shipped". |
AI Invoice Visual Variance Indicators
Specific cells in the AP reconciliation grids are now bolded and highlighted with an orange background when a variance is detected. These grids are available in Deacom on the bottom of the Enter Invoiced Received form and the PO Adjustments form.
Prerequisites
Note: The highlighting only triggers if the relevant variance columns (qtyvar, pricevar, or extenvar) are present in the grid layout. If these columns are removed via user customization, the highlighting will not apply to the related quantity or price cells.
Conditional Highlighting:
- Quantity Variance: If the received quantity does not match the invoice quantity, the Received Qty and Invoice Qty cells are highlighted.
- Price Variance: If the unit price does not match the invoice price, the Price and Invoice Price cells are highlighted.
- Extension Variance: If the extension variance is non-zero, the Exten Variance cell is highlighted.
- Combined Variances: If a line has both a price and a quantity variance, all four related cells (Received Qty, Invoice Qty, Price, Invoice Price) plus the Extension Variance will be highlighted.
Exclusions: Adjustment lines (where partid is 0 or invadjust is true) are excluded from this highlighting logic as they are not expected to contain variances.
Rounding: The system evaluates variances based on standard rounding (6 decimals for quantity and 4 decimals for price).